Decision 4 – How will I control the lights?

Today’s post I’ll be answering the above question in very broad sense. What do I mean by this? Well, the question can be interpreted in a few ways, whether it relates to software, hardware, electronics, etc. So I will break down the various components of the system at a high level.

The exact hardware technology choices – will be up and coming in Decision #6 down the track – or have been discussed before in Decision #2.

We want to take some form of programming, and make lights blink to our instruction – so what comprises a Christmas Light system from end to end, in order to make that happen? Let’s start at the fun bit, the blinking lights, and work our way back to the source.

LED Pixel Lights

These are so called because they operate similarly to a pixel in a computer monitor. They have three coloured LEDs, red, green and blue, which when turned on to varying brightness can mix and create the full spectrum of colour. In Decision #2, I discussed the different physical types of pixels used, but not their operation.
Pixels are controlled by an Integrated Circuit, which takes in some format digital signal, and reads the red-green-blue (RGB) data from the data to switch on the three elements at an appropriate brightness. There are a numerous formats, but the most common is WS2811, discussed below.

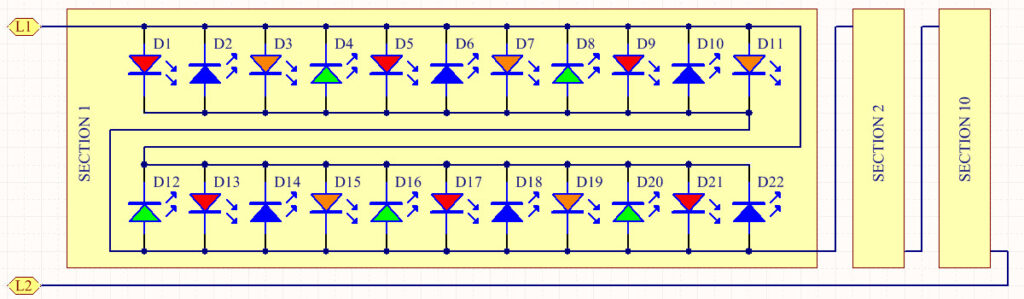
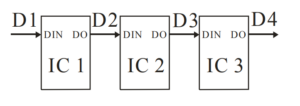
The lights are daisy chained, and the first light is fed all the data for the entire string of LEDs. Every pixel chip grabs the first pixel worth of data from the stream, processes it and illuminates. It then strips that data from the stream, and passes on the remaining data. Because of this, there are no ‘addresses’ – each pixel just processes data in order. If pixels for a certain function are swapped, then the data stream needs to have the data swapped too.

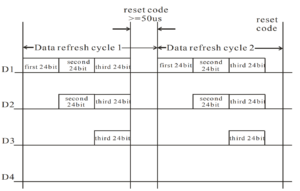
The below diagram shows how the pixels are interlinked, each pixel has a data input (DIN) and data output (DO). They are connected serially. The second image shows the data at the 4 points between the interconnected pixels, where each is stripping the first data it sees and passing the rest down the line.

Interconnection between pixels
Data as it travels between pixels

Pixel Controllers

In order to generate the pixel data, we need a controller that understands the protocol used by our pixels. There are numerous controllers out there on the market, many developed for the Christmas Lighting hobby, and some professional designs as well.

These controllers will generally receive channel-based data in a standardised format over an ethernet network – typically E1.31 (sACN / DMX over IP) and decode this into RGB pixel format from triplets of channels. There are other protocols, such as ArtNet and DDP, which perform a very similar function to E1.31, but with minor protocol differences.

You can map the input data to the output pixels, as well as set global brightness levels, set up virtual strings, and set the pixel output formats.

Some controllers are stand-alone, meaning they run firmware in them, and operate as a complete unit, and some are expansions on top of Raspberry Pi or BeagleBone boards, utilising the GPIO connections and programmability of these platforms.

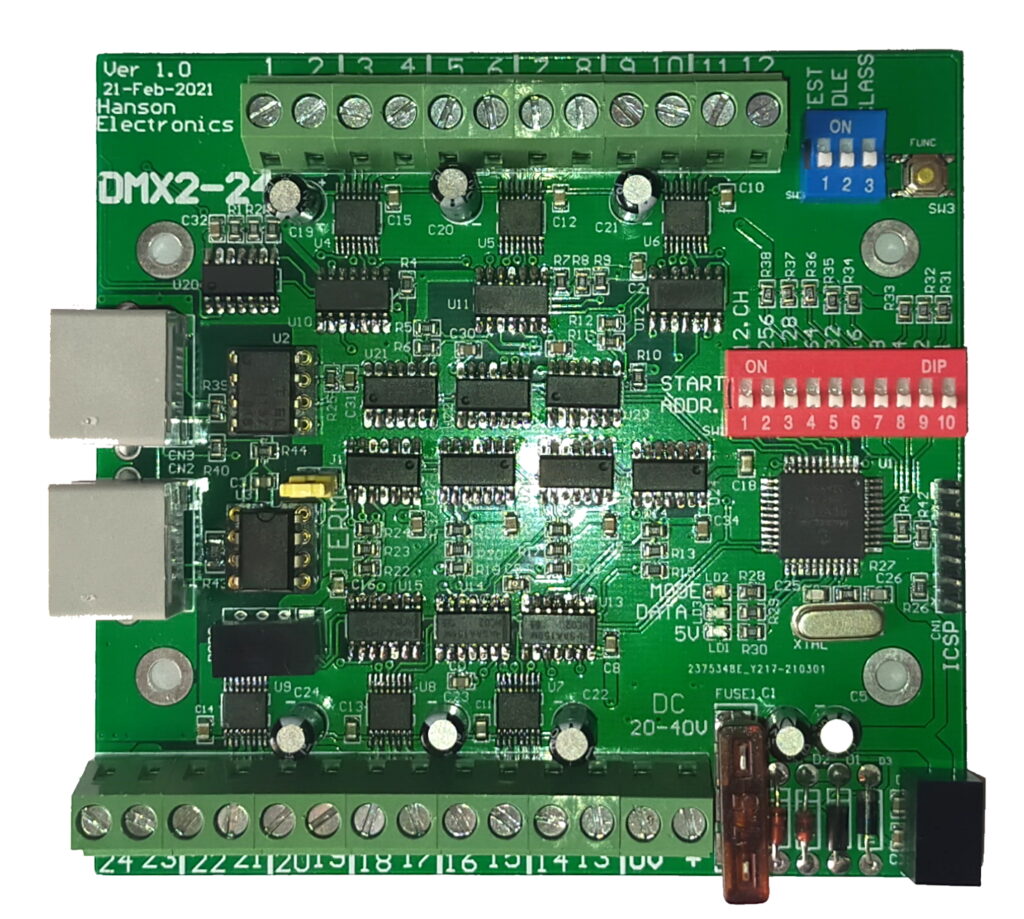
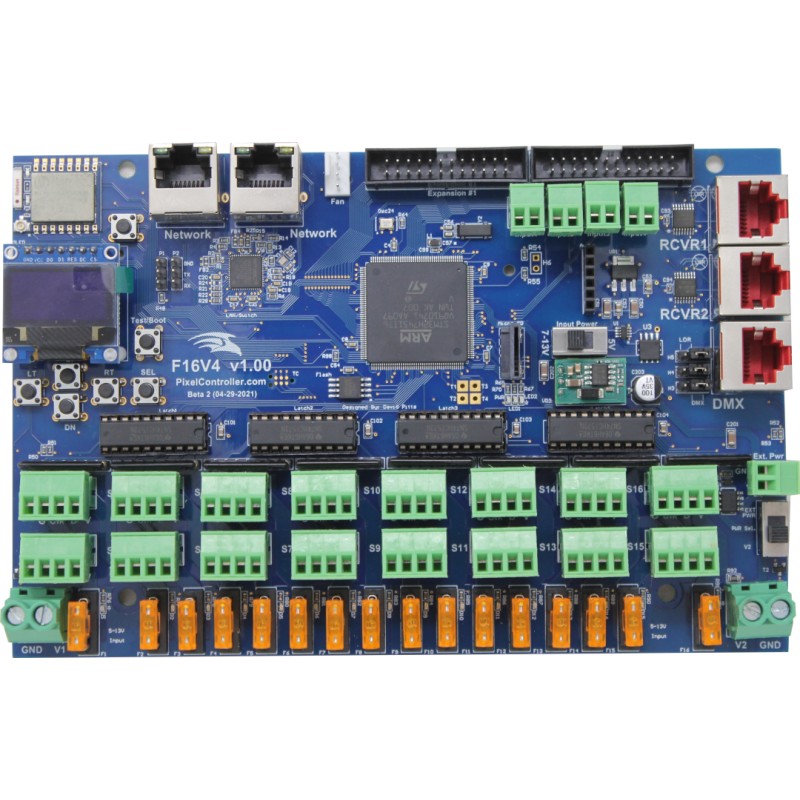
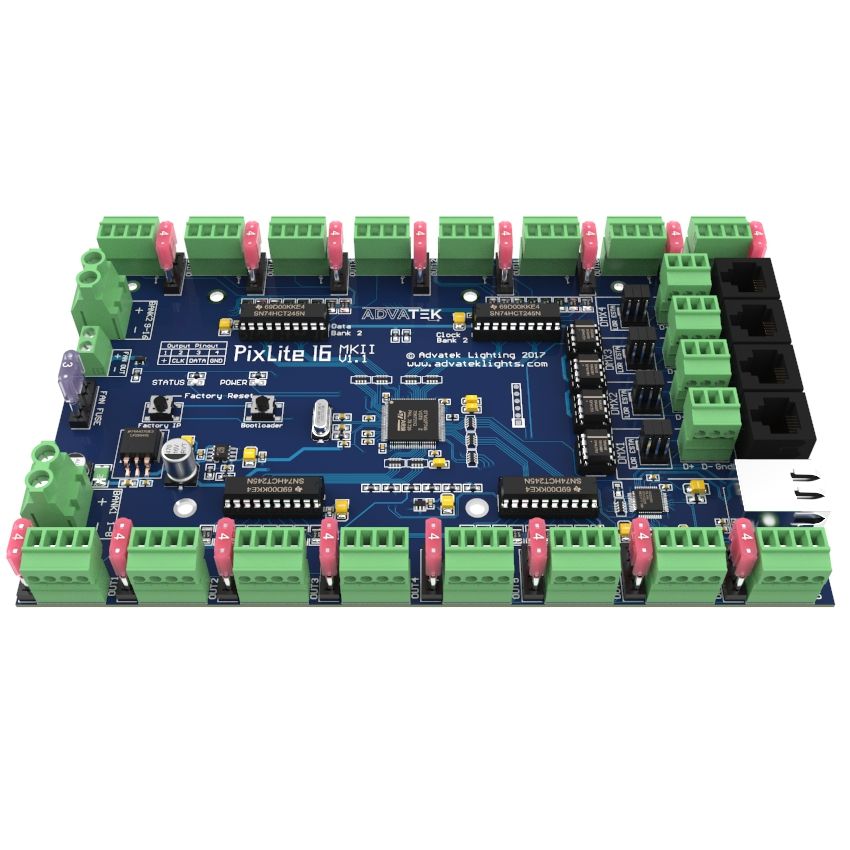
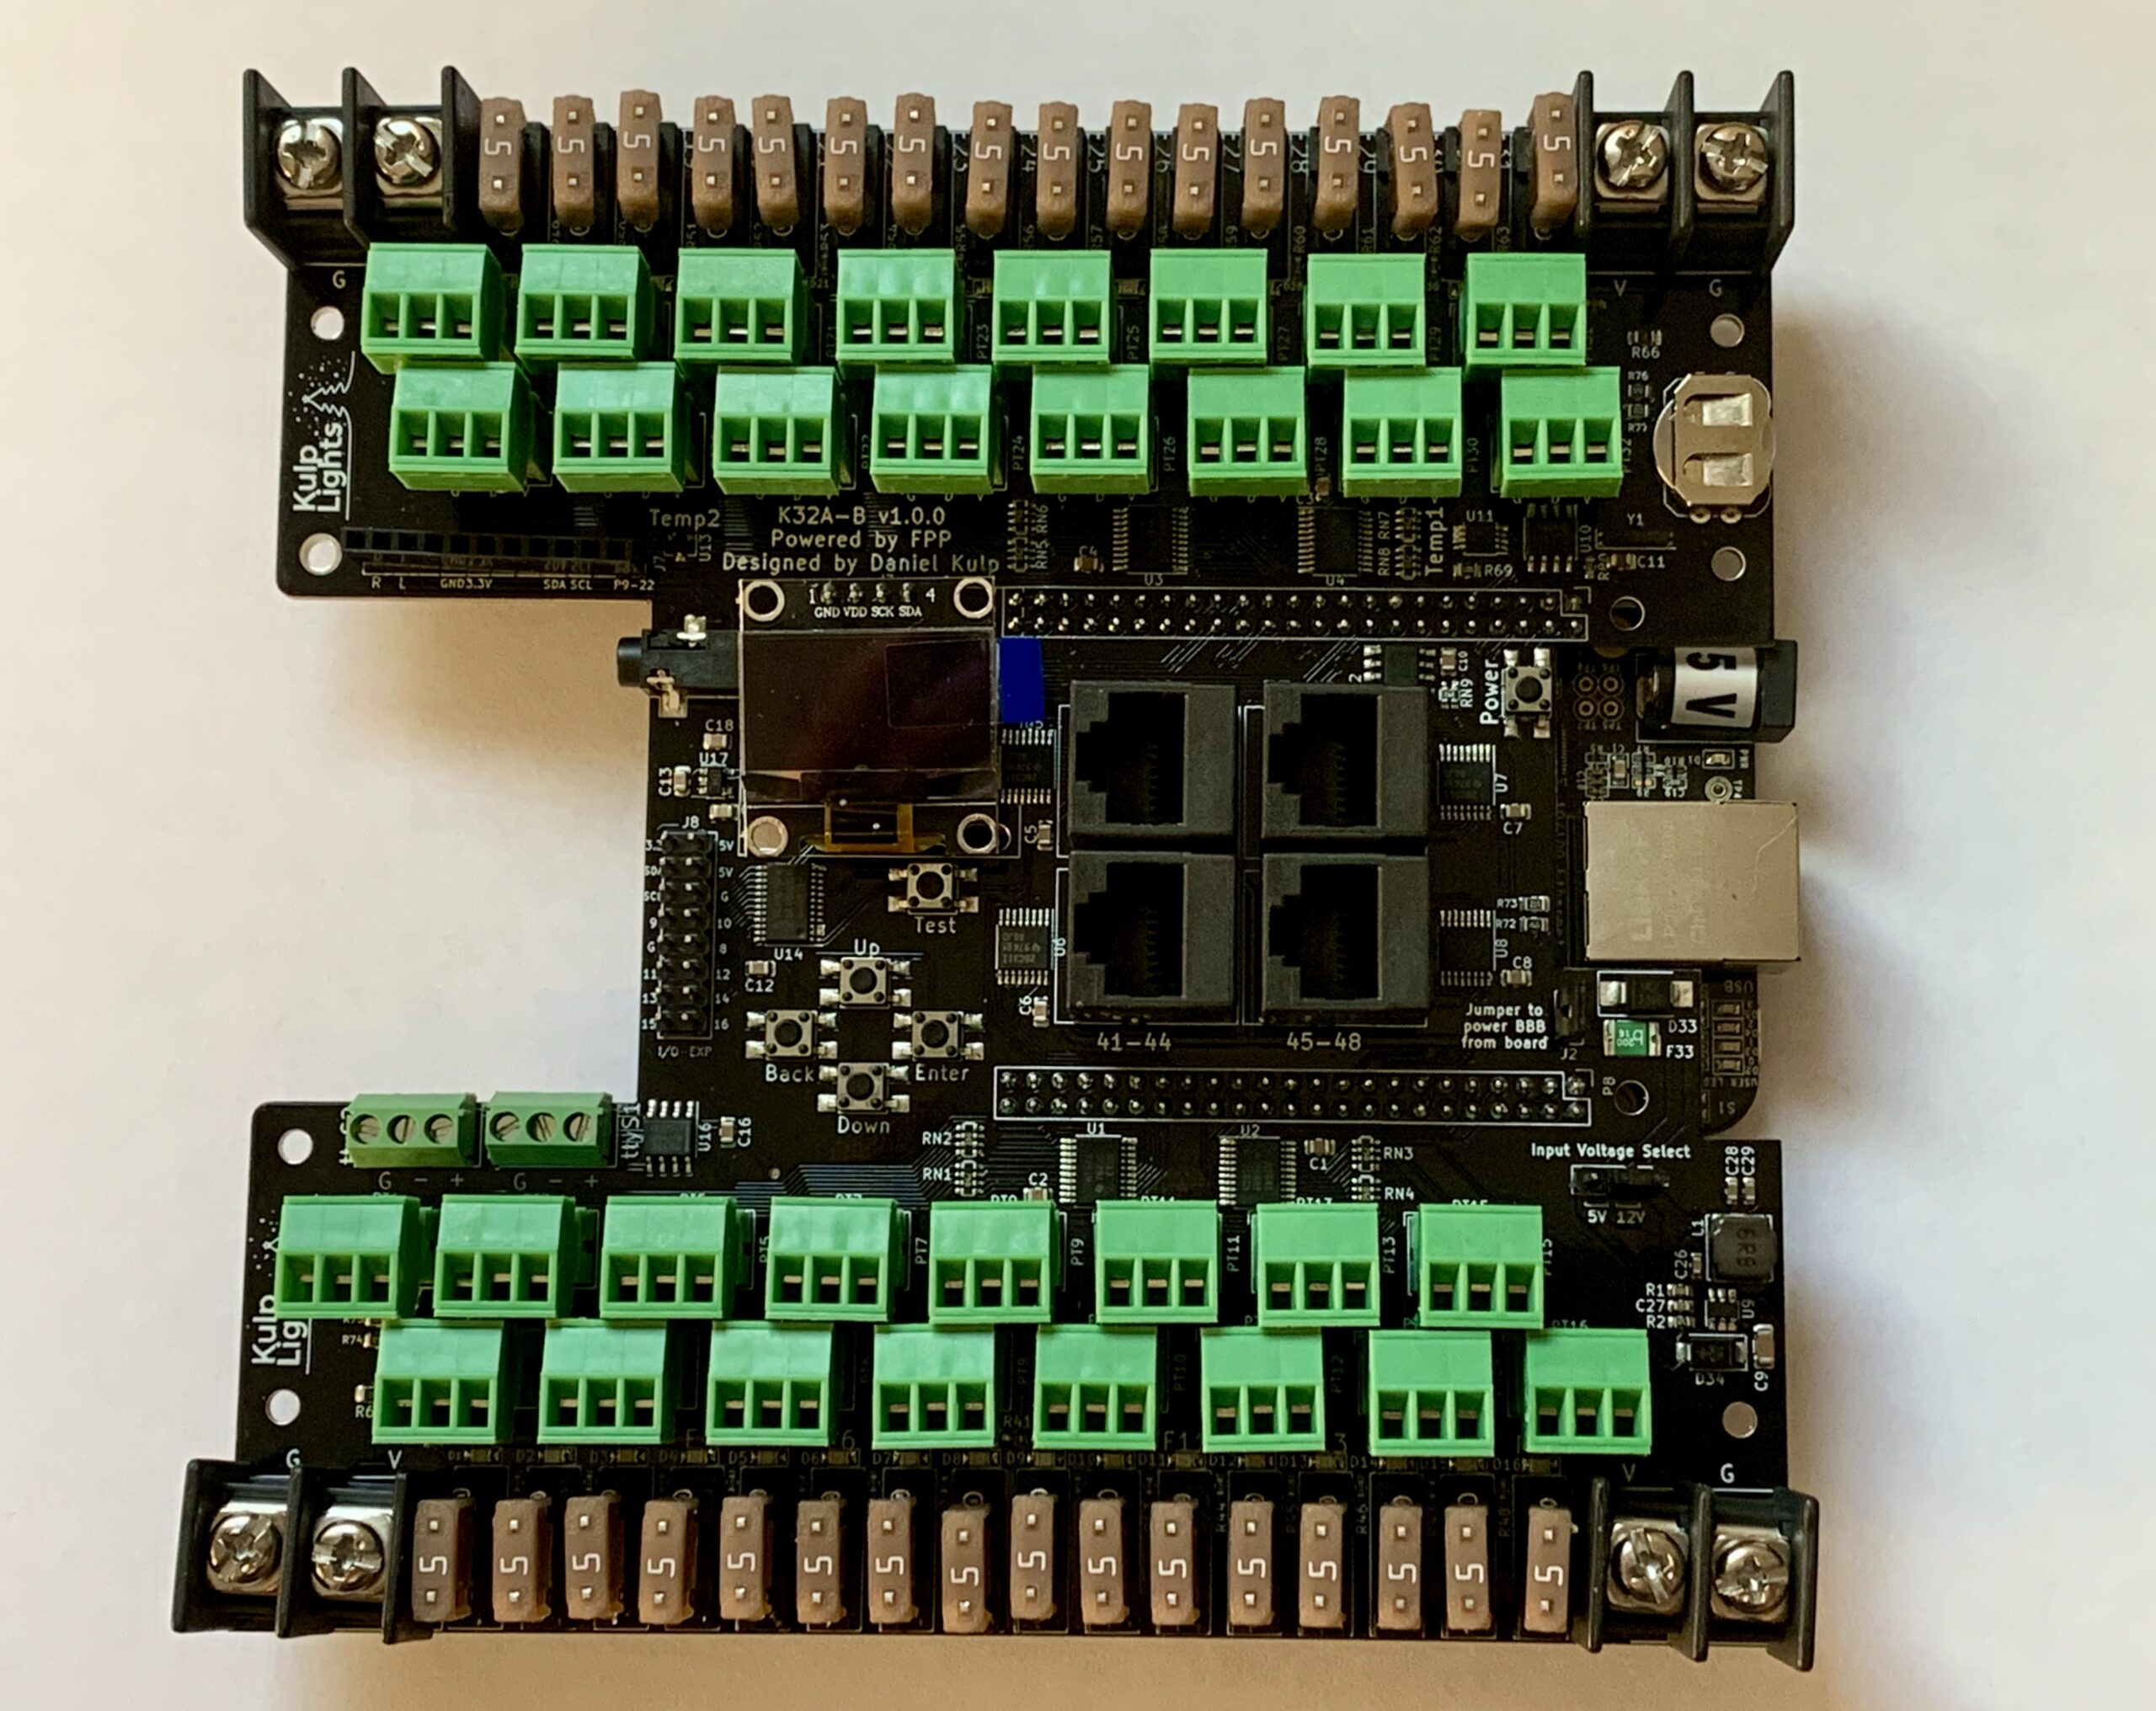
Controllers range from 1 to 48 pixel outputs, with anywhere up to 1500 pixels per output, as well as being able to drive differential outputs which allow long-range transmission of pixel data without signal quality loss.

Four examples are below, two firmware boards – the Falcon F16V4, Advatek Pixlite 16 mk2 – and two BeagleBone boards – the Kulp K32a-b and Hanson HE123mk2. Click the images to go to the manufacturer website to find out more.

Playback

Once a sequence has been programmed, there needs to be a way to generate the control data – Artnet, DDP or E1.31, and send this to the pixel controllers, for display on the lights.

This is where a playback platform is needed. There are three main ways to do this; 1. Use the controllers inbuilt player, if it has one, 2. use a PC running software, or 3. use a small-board computer running software.

When using the controllers player, the sequence is uploaded to the device, which generally controls its own outputs only. The controller would also need to support generating the sound, if your sequence is programmed to music. Currently the Falcon controllers are the ones best suited to this mode of operation.

On a PC, software called xSchedule can generate the required network output from the sequence files. The PC sound card can also generate the audio. xSchedule can run on Windows or Linux, so there is a choice of operation there. The disadvantage to this is that it requires your computer to be dedicated to the show, meaning you can’t use it for other purposes (well, you can, but it could cause show issues) – and the power consumption of a full-sized PC is not immaterial.

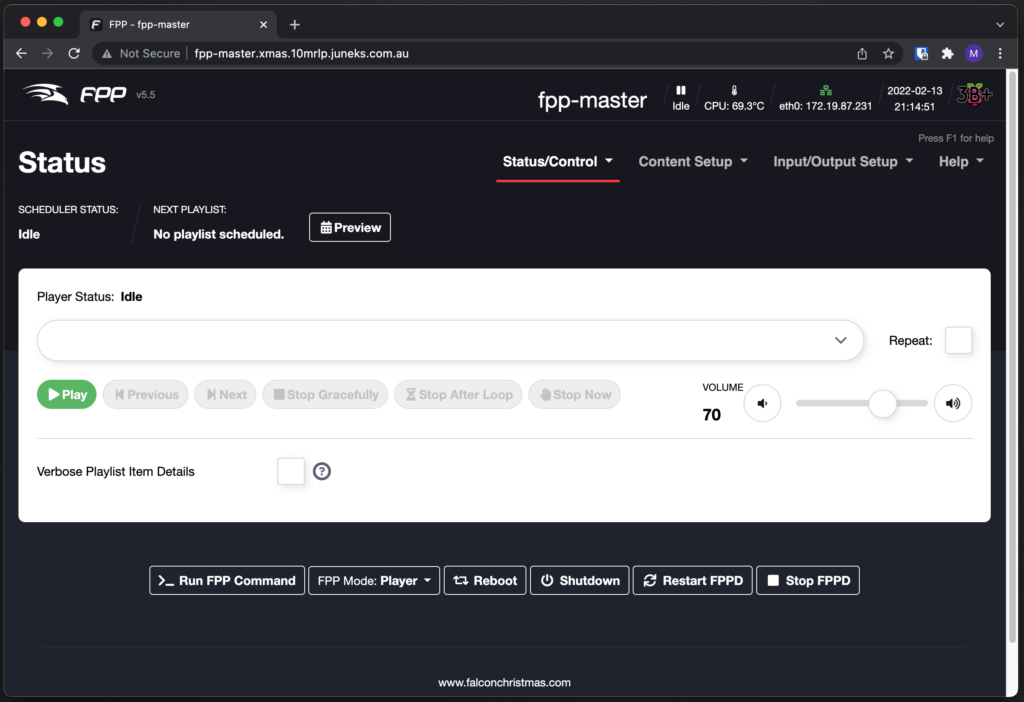
The third option is using a small-board PC, such as Raspberry Pi. A piece of software called “Falcon Player”, or FPP for short, was developed for this purpose. It is flexible enough to play audio (either via USB sound card or the boards sound output) – as well as control pixels via ethernet output, and local connections. It can also receive data from another player, or perform synchronisation of local playback to minimise network traffic. In fact, the small-board computer based controllers (such as the Kulp and Hanson above) use FPP as their software loaded on their computer.

This is a screenshot of what FPP looks like without anything loaded. It uses a web front end that’s straight-forward and easy to use.

Falcon Player running on a test machine that I’ve set up

Sequencing

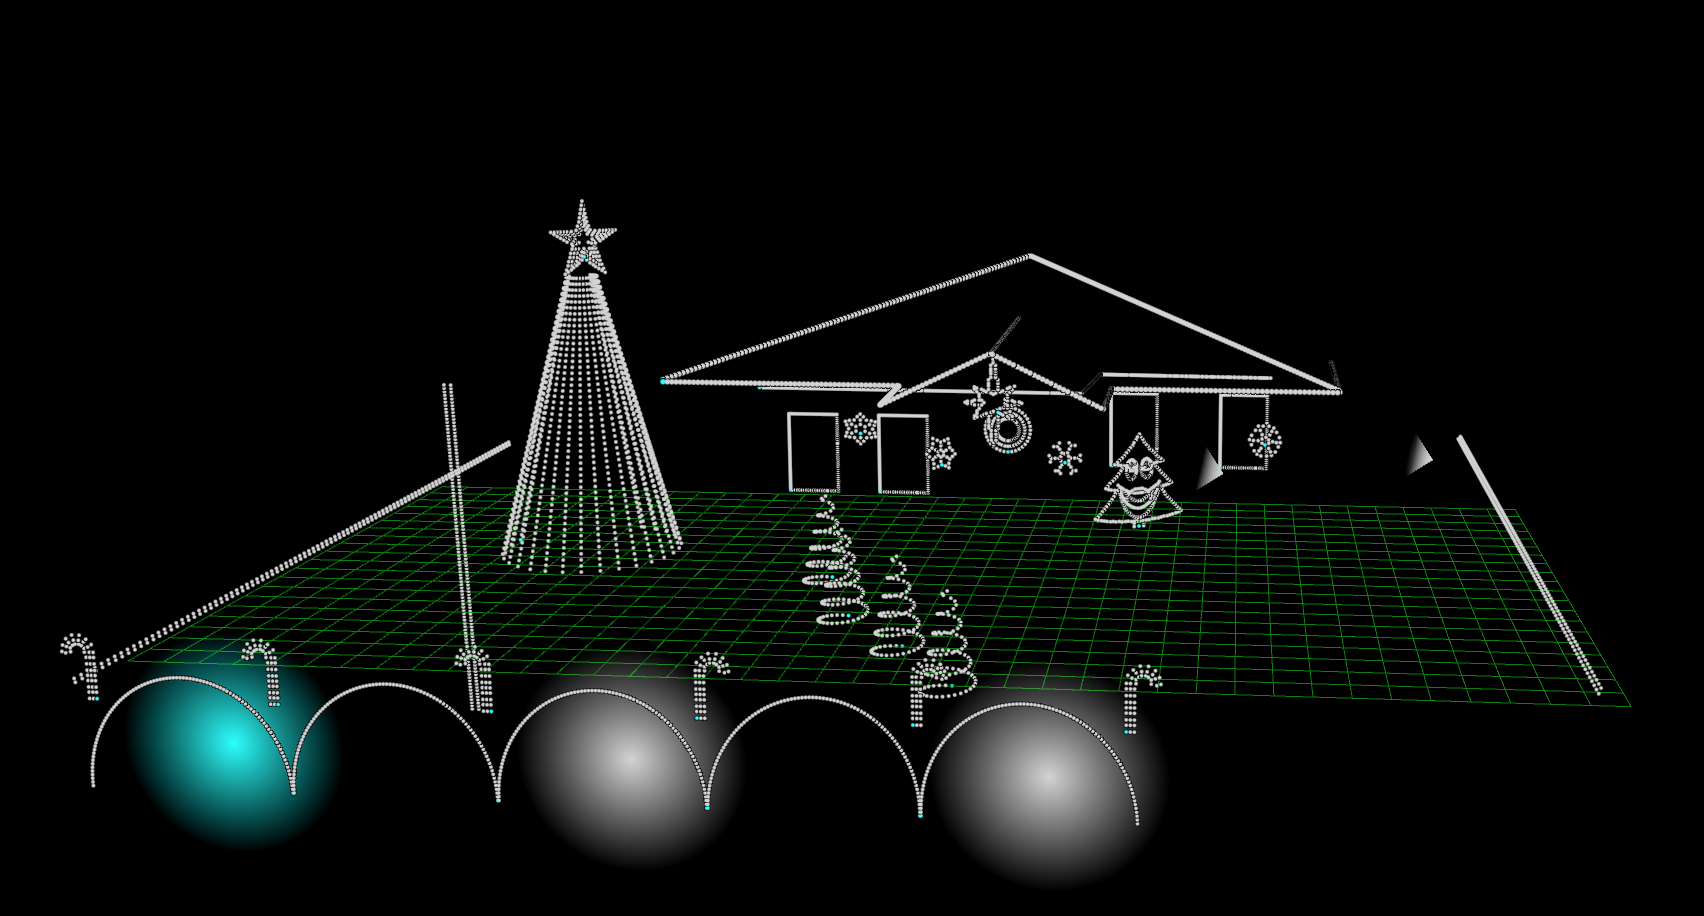
Creating a sequence involves loading in your music track, configuring what your display looks like, and placing effects as you see fit. You can also import sequences that others have created (there are numerous vendors that sell sequences).
Three main packages are used within the hobby – those are xLights, Vixen 3 and Light-O-Rama.

The first two are open-source / free, and the third is a paid product, specifically designed to work with the Light-O-Rama software.

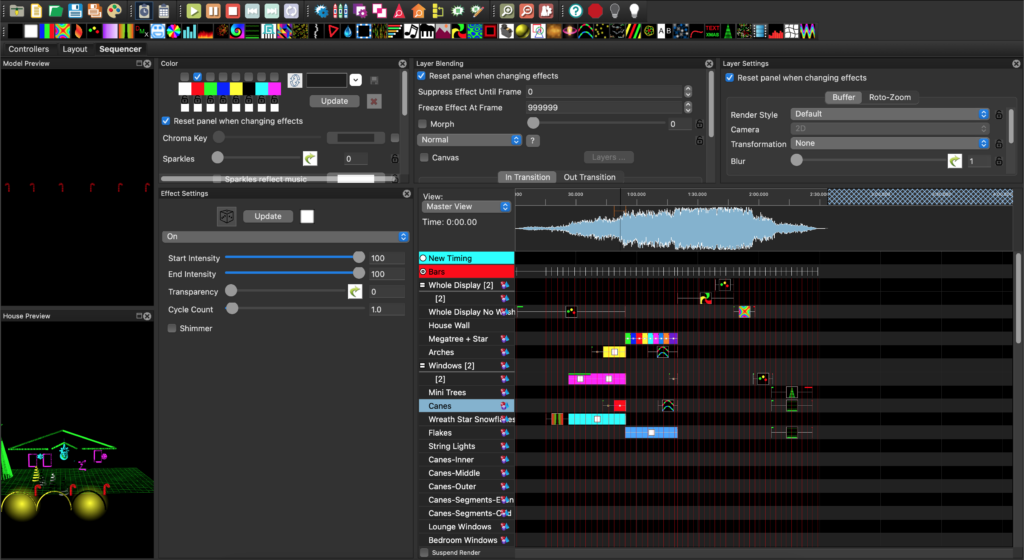
When looking at the pieces of software, I found xLights to be the most intuitive, and it has a massive community support group behind it, and loads of online videos. It also integrates well with the controller hardware, allowing remote configuration directly from the software.

xLights will run on Windows, MacOS and Linux, with cross-compatibility of files between all the platforms. Additionally, it can import files from other platforms and work as a go-between if needed.

xLights running on MacOS

Network

Being a network engineer, dealing with real-time traffic such as voice, I cringe a little bit at some information that’s posted out there. Plenty of information will state that you should have a dedicated network, separate from your home network. This, I agree with 100%. This complicates things as your sequencing computer needs access to both networks to operate, which can be achieved a couple of different ways. This is where I think some of the suggestions are a little wild, but for the layman they might work well. But, I won’t get into the ins-and-outs of it here, suffice it to say, that I have read the advice with a grain of salt, and come up with my own network design.

My home network is not your standard home network. I run a bunch of enterprise network gear (Juniper, Cisco, Huawei, Mikrotik), have a few servers for virtual machines, development environments, and as well I host mail and files for the family business. As such, there are around 12 VLANs split across as many subnets, and dynamic routing linking my property to 5 others.

So I have added another VLAN, logically segregated from the rest of my environment, and there will be a dedicated switch running the show when it happens. The advantage of configuring it this way is that it gives me the flexibility to incorporate the subnet into my standardised networking, that IP routing ‘just works’, and that I can light up a show-network port anywhere on my network, such as in my workshop as required.

Power

This is something that deserves a whole new post. Coming up next! 😉

Summary

So as you can see, plenty of pieces of hardware and software tie together, sitting on an underlying network, making all of this possible. I’m sure this all makes sense in my mind, and if anyone is reading this planning their own show, I hope it makes sense to you too.
If you are starting a show for yourself, please, feel free to reach out to me with any questions or comments; I’d love to help; alternatively (and maybe as well as!) – sign up to AusChristmasLighting – there are some fantastic resources in there and plenty of folk who have done this many times before.

Decision 3 – Incorporating Existing Lights

In the world of pixels and programming, it appears from the outside that the legacy light string is left behind. However, due to the crossovers as people were migrating displays from AC based, to DC based, and then to pixels, some special circuit designs were made up. These allow for either DMX or “pixel protocol” based control of DC strings (and in some cases mains rated AC strings).

Older style low-voltage lights typically had 2 or 4 wires to the lights, with a single common (either positive or negative rail). By switching on one of more of these individual lines, a particular colour or segment of the light string would light up. This was a relatively straightforward method of lamp control.

In the mid-2010’s a new style of LED light controller was designed, which uses two wires from the controller to the light set. As LEDs are polarised devices, they will only illuminate when the positive and negative rails are the correct way around. This has its benefits. By alternating the polarity of every second LED, the when applying the voltage one way, the odd numbered – first, third, fifth, etc LEDs would illuminate. When reversing the polarity, the even numbered LEDs would switch on. In order to display all LEDs on simultaneously, the controller is actually reversing the polarity to the string at a rate faster than the human eye can see, giving the appearance that they are all on, when in fact only half is ever on at any one time.

Credit to David_AVD of DAShare for this image [Link]

This method is used in the BigW and Bunnings Lytworx style controllers, as well as many other cheaper designs. This provides a complication, as it’s not simply a matter of switching one, two, or more wires on to enable the colours, but a smart controller is needed.

Which brings me to the crux of this post – is it possible to utilise these style strings within a pixel display – and the answer to that is YES!

A bloke by the name of Alan Hanson (of Hanson Electronics) based in Victoria came up with a circuit design which takes in DMX data (24 channels worth) and can interface with 12 of these strings, providing independent control of both “polarities” within the string. This means that it’s really easy to integrate this in with the display. The product itself is called the DMX2-24 – and I have acquired one for this project, along with a USB DMX dongle

So what this means is that I am able to keep utilising my existing purchases until I’ve replaced them with pixels. Having this board also means that should I ever forgo the basic lights in my main display, I can use it at other premises to provide some animation to existing sets.

I’ll have more information coming in the Technical Experiments section as I play with and learn the device further.

Decision 2 – What types of lights should I use?

There is wide debate on the internet as to whether to use strip lights, or nodes/bullets. To start off with, here is a description of each type.

Strip Lights

Strip lights come on a flexible PCB, with surface mounted LEDs, and often an adhesive backing. These are either WS2812B style (LED and IC in the one package) or WS2811 (where the LEDs are separate from the driver chip). There is a variance on LED density, from roughly 30 per metre, all the way up to super dense at 144 LEDs per metre. 5V ones are generally individually controllable, whereas 12V are grouped into threes, to cope with the voltage differences.
These are able to be cut and rejoined on specific markers, and include the PCB pads to attach wiring for this purpose. They can either be bare PCB, resin coated, or in a silicone tube – each providing increased levels of water ingress protection. In the image below you can see the difference between the different densities.

Bullets / Nodes

Pixel nodes/bullets are individual 8mm RGB LEDs soldered to a little PCB which contains a WS2811 driver chip. It may also include either resistors or voltage regulators on 12V versions to drop the voltage to 5V. They are connected by various lengths wiring – often around 100mm – to the next pixel, forming strings of either 50 or 100 nodes.
Each pixel is encased in epoxy to provide water proofing. These can be pushed into props, held in place with cable ties or various other mechanical holding techniques. The wiring can be cut at any place to add or remove individual or groups of pixels, and rejoined as necessary.
Whilst I talk about bullets primarily here, there are also square nodes, which I am not using to begin with. They have very similar properties to bullets, but are a different shape and slightly different design. The pros & cons below apply to both equally. The image below shows the bullet vs square node type.

Pros & Cons

So – why would you choose one of the the other?

  • Nodes are much easier to repair than strips, as strips require carefully cutting out the bad section and solding fine pads, and then re-waterproofing the assembly
  • Nodes can be pushed into props, whereas strip cannot
  • Nodes are more durable whereas strip is quite fragile
  • Strip is easier to get in a nice straight line, without loose wiring
  • Strip provide a less ‘pixelated’ look, and give a cleaner finish once installed

So there are some places where strip is great, and some where nodes/bullets are great.

Can they be mix and matched?

Absolutely! They all use the same protocol, so they can even be part of the same string. There’s nothing stopping you having a line of LEDs which is Strip then Nodes then Strip again.

Decision Time

I’ve decided that I will use bullets for the majority of the props, roof outlines, gutter lines, and mega tree. This is because it’s easier to work with and repair.
However, for the arches, strip will be used as it’ll be encased in plastic tubing, providing protection, and it’ll give a nice even lighting. Additionally, I’m also going to mount strip on the eave to shine onto the house which will provide a nice neat out-of-the-way look.
As for the mini-trees, those have yet to be decided. I have budgeted to do them in either, and I’ll give both a try and see what looks the best and is easiest to manage.

Decision 1 – What do I want the display to look like?

This is the hardest question to answer. I had some clues from looking around various YouTube videos of what others had done, and how I could incorporate aspects into my own design.

A couple of design aspects stood out which I am looking to incorporate in the final show where possible.

  • Roof outline – Crisp lines bordering the gutters and ridge look great. That was a must. Adding verticals for the columns and edges of the house may come later.
  • Leaping Arches – The bounce to musical sequences really helps ‘liven’ up the display
  • Mega tree – A mega tree is always a focus of a display. It grand stands in the yard really bringing attention to itself, and the ability to run a multitude of effects makes them very visually appealing.

Jace (my wife) has been across some of the design and the possibilities, and one deign aspect that she really liked was singing Christmas trees. Additionally, I thought a bit more Christmas look with snowflakes, a Bethlehem star and some candy canes would be nice too.

The next step was to start laying out the design within xLights. This is the software used to program sequences. It has both 2D and 3D capabilities. In 2D mode, you take a photo of your house square on, and you lay on the models. This has limitations when it comes to rendering effects (later down the track) so by using 3D mode, you can offset each item on the Z axis as well.

This is the design that I am working towards.

xLights Design
  • 5 arches spanning across the 5 front fence panels
  • 6 candy canes, mounted on each fence post
  • 3 flood lights to light up the hedge different colours. These might end up shining on the house later, but that’ll be a decision once they arrive.
  • 4 mini trees on the front lawn. These stand about 1.4m high.
  • Mega tree and a 3′ star on top.
  • Singing tree on the diagonal portion of the front porch, so it’s visible from the driveway
  • Bethlehem star over the front entry
  • Wreath on the door
  • 4 snowflakes, one between the lounge windows, and three on the columns
  • Window outlines
  • Roof & gutter outline
  • House wall lighting
  • Fence lighting
  • Palm tree lighting

All of this adds up to a fair amount of effort, but I think it’ll look nice. It’ll also give me opportunity to add further, and each component can be done separately, so that if it’s not ready by year one, it can be used next year.

Planning the Show

A lot of reading has happened in the last month, in addition getting some valuable advice from the folks at the ACL Forums & Chat. This has led me down rabbit holes of research, to figure out the best way to design the show.

A number of questions needed to be answered, with each answer flowing into the next decision to be made.

  1. What do I want the finished display to look like? ie. What props, what effect, what sort of look am I going for?
  2. What types of lights should I use, strip, nodes, etc?
  3. Can I incorporate any of the existing light strings I already have?
  4. How will I control the lights?
  5. How will I distribute power to these lights?
  6. What hardware do I need to make this all happen?
  7. How much will it cost?
  8. What do I need to cull to fit into any reasonable budget?

In early January, I met up with one of the blokes from the ACL website, Kent. He had his first Christmas display up in 2021, so I’m trailing one year behind. He offered many pointers, and showed me his setup – unfortunately I didn’t get a chance to see it in action, but it was great to catch up and discuss things.

Being a lovely bloke, he also lent me a few pieces to play with – 40 odd nodes, an ESP32 controller and a DC-DC convertor. I had also picked up a 2m strip of LEDs from Jaycar in the interim and starting playing around with those hooked up to a Raspberry Pi. Some more technical posts on these will be coming up.

Over the next few posts, however, I’ll discuss the above decision points individually, and explore the answers that I have come up with.

In The Beginning

I’ve always been into Christmas light displays. Various basic light strings here and there, nothing too special. But the last few years I have been very slack.

In early December 2021, my right-hand neighbour put up a nice display, nothing too out there – a few Big W strings on the house, and around his fence. It was also at that same time which I was putting up the Christmas Tree, and getting all the decorations out.

So, I thought, why not put up some of the lights I had squirreled away. Motivation was also driven by the fact that in January 2021, I welcomed my first child into the world, and it would be nice to make something special.

However, I had no such luck, the old lights were all filament strings, and most weren’t working properly. So off to Bunnings, and I picked up 4 strings of lights, three for outside, one for the tree inside.

These came out pretty nice, for the first go – the neighbour on the left-hand side has two kids, 5 and 3, off memory, and they were amazed by the lights, despite how simple it could be.

So – what could I do to make it better? I’ve always been interested in computer driven lights, however where to start? Did I need to write software on an Arduino; build a lighting controller, and do it like that?

This is when I stumbled upon the Australian Christmas Lights forum (ACL). They have a fantastic guide (the ACL101) – which details all the bits you need to do, and consider, for a fantastic display. I was absolutely blown away by the software and hardware already out there to make this happen.

From there, the bug had bitten. I was hooked. The research started.